Draw a Cone Icecream
In this lesson you will learn how to draw an icecream cone.
Step 1:
Create a new document 400x500 px.
Now set the Ruler shown below:
Step 2:
Set your foreground color to #bd8b66.
Select 'Line Tool' from your tools and draw the line like shown below:
Step 3:
Select Magnetic Lasso Tool and make a selection like shown below:

Step 4:
Select paint bucket tool and fill the selection with this color #bd8b66.
Then press Ctrl+D for deselect the selection.
Step 5:
Go to Filter> Noise> Add Noise and apply the following setting:
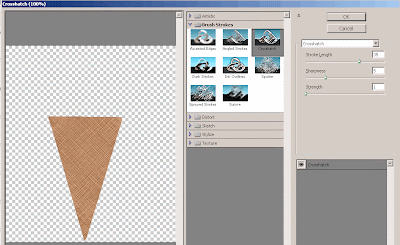
Now go to Filter> Brush Strokes> Crosshatch and use these settings:
Step 6:
Select Dodge Tool and create the following highlights.
Step 7:
Create a new layer and select Lasso Tool and make a selection shown below.
Now fill the selection with this color #ffbfbf and press Ctrl+D for deselect the selection.
Then make these small strawberry chunks on the icecream and fill these chunks with color #cf0dod.
Step 8:
Again select the Dodge Tool and create the following highlights on the icecream.
Step 9:
Create a new layer and then make a selection only icecream.
Now press 'D' to set your foreground color black.
Go to Filter> Render> Clouds and then go to Filter> Render> Difference Clouds.
Now go to Filter> Distort> Glass and apply the following setting:
And finally set the new layer blending mode to 'Soft Light'.
Final! Cone Icecream
2 Comments:
At July 28, 2009 at 12:55 AM , Anonymous said...
excellent drawing!
At August 9, 2010 at 3:19 AM , Photoshop Clipping Path said...
gr8 job That bit was pretty impressive, thanks for posting.
Post a Comment
Subscribe to Post Comments [Atom]
<< Home